Manage files on hdfs with ambari files view
Contents
- Prerequisites
- Outline
- Produce a Directory in HDFS, Upload personal files and List Contents
- Prerequisites
- Outline
- Produce a Directory in HDFS, Upload personal files and List Contents
- Discover Space Utilization inside a HDFS Directory
- Download File From HDFS to Local Machine
- Explore Two Advanced Features
- Summary
- Further Studying
In the last tutorial, we learned to handle files around the Hadoop Distributed File System (HDFS) using the command line. Now we’ll use Ambari Files View to do most of the file management operations on HDFS that people learned with CLI, but with the web-based interface.
Prerequisites
- Downloaded and deployed the Hortonworks Data Platform (HDP) Sandbox
- Understanding the Ropes from the HDP Sandbox
Outline
- Download the Motorists Related Datasets
- Produce a Directory in HDFS, Upload personal files and List Contents
- Discover Space Utilization inside a HDFS Directory
- Download Files From HDFS to Local Machine
- Explore Two Advanced Features
- Summary
- Further Studying
Download the Motorists Related Datasets
We’ll download geolocation.csv and trucks.csv data onto our local filesystems from the sandbox. The instructions are targeted at mac and linux users.
Then, we’ll download geolocation.csv and trucks.csv data onto our local filesystems from the sandbox. The instructions are targeted at mac and linux users.
1. Open a terminal in your local machine, SSH in to the sandbox:
ssh root@sandbox-hdp.hortonworks.com -p 2222
Note: If you are on VMware or Docker, make sure that you map the sandbox IP towards the correct hostname within the hosts file. Map your Sandbox IP
2. Open another terminal, improve your current directory to Downloads then copy the instructions to download the geolocation.csv and trucks.csv files. We’ll rely on them basically we learn file management operations.
#Improve your current directory to Downloads
cd Downloads
#Download geolocation.csv
wget https://github.com/hortonworks/data-tutorials/raw/master/tutorials/hdp/manage-files-on-hdfs-via-cli-ambari-files-view/assets/motorists-datasets/geolocation.csv
#Download trucks.csv
wget https://github.com/hortonworks/data-tutorials/raw/master/tutorials/hdp/manage-files-on-hdfs-via-cli-ambari-files-view/assets/motorists-datasets/trucks.csv
#Create directory for motorists-datasets
mkdir motorists-datasets
#Slowly move the geolocation and trucks csv files towards the directory
mv geolocation.csv trucks.csv motorists-datasets/
Produce a Directory in HDFS, Upload personal files and List Contents
Create Directory Tree in User
1. Login to Ambari Interface at sandbox-hdp.hortonworks.com:8080. Make use of the following login credentials in Table 1.
Table 1: Ambari Login credentials
| Username | Password |
|---|---|
| admin | **setup process |
Setup Ambari Admin Password By hand
2. Now we have admin rights, we are able to manage files on HDFS using Files View. Hover within the Ambari Selector Icon  , go into the Files View web-interface.
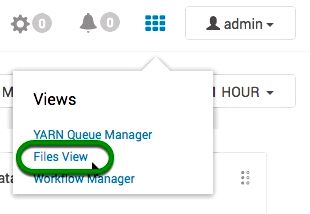
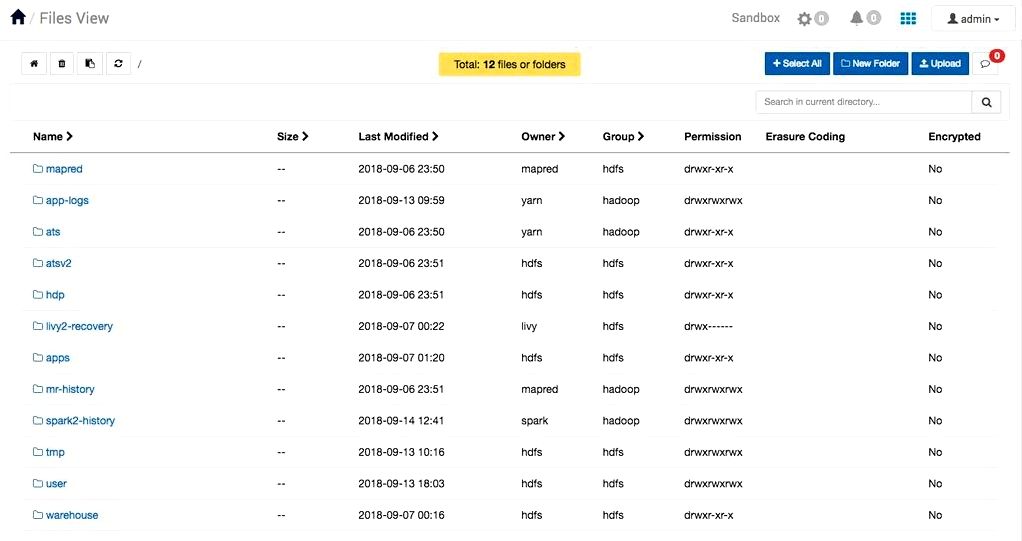
The Files View Interface can look using the following default folders.
3. We’ll create 3 folders while using Files View web-interface. All three folders: hadoop, geolocations and trucks the final two that will live in the hadoop folder, which resides in user.
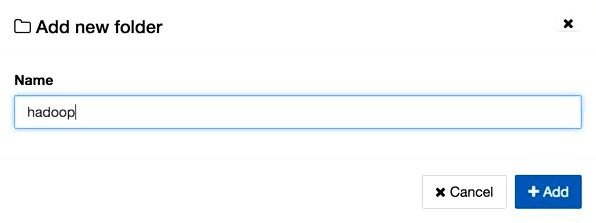
Navigate in to the user folder. Click on the new folder button  , an add new folder window seems and name the folder hadoop. Press enter or +Add
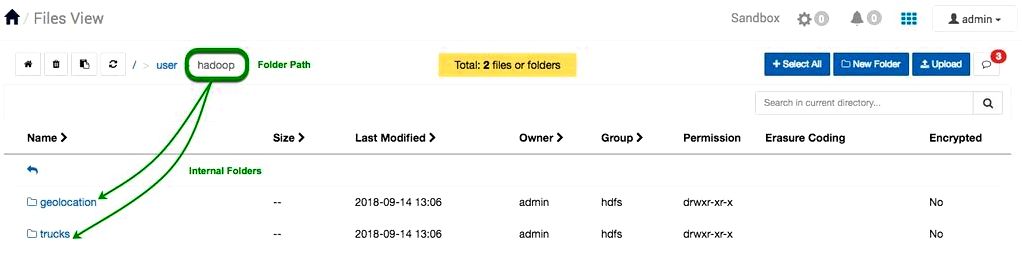
4. Navigate in to the hadoop folder. Produce the two folders: geolocation and trucks following a process mentioned in the last instruction.
Upload Local Machine Files to HDFS
We’ll upload two files from your local machine: geolocation.csv and trucks.csv to appropriate HDFS directories.
1. Travel through the road /user/hadoop/geolocation or maybe you are already in hadoop, go into the geolocation folder. Click on the upload button  to transfer geolocation.csv into HDFS.
An Upload file window seems:
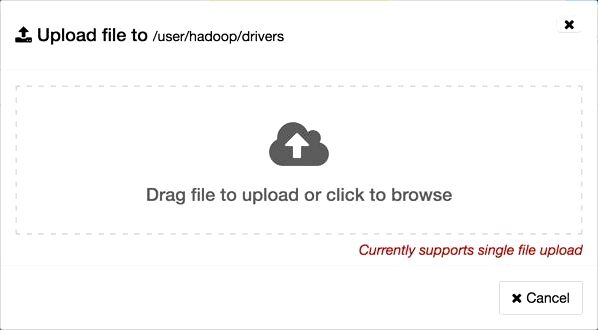
2. Click the cloud by having an arrow. A window with files out of your local machine seems, find geolocation.csv within the Downloads/motorists_datasets folder, select it after which press open button.
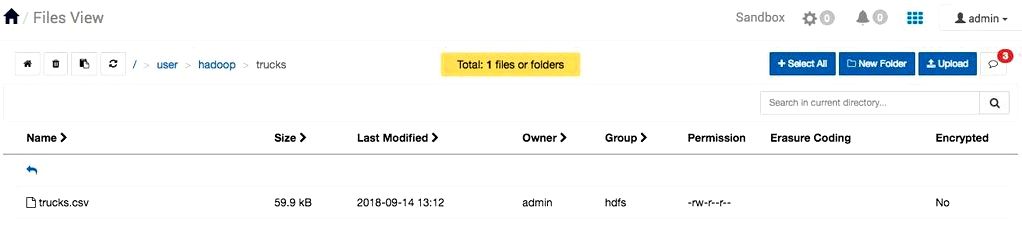
3. In Files View, visit the hadoop folder and go into the trucks folder. Repeat the upload file tactic to upload trucks.csv.
View and look at Directory Contents
Every time we open a directory, the Files View instantly lists the contents. Earlier we began within the user directory.
1. Let us navigate to the user directory to look at the facts provided by the contents. Reference the look below when you browse the Directory Contents Overview.
In the last tutorial, we learned to handle files around the Hadoop Distributed File System (HDFS) using the command line. Now we’ll use Ambari Files View to do most of the file management operations on HDFS that people learned with CLI, but with the web-based interface.
Prerequisites
- Downloaded and deployed the Hortonworks Data Platform (HDP) Sandbox
- Understanding the Ropes from the HDP Sandbox
Outline
- Download the Motorists Related Datasets
- Produce a Directory in HDFS, Upload personal files and List Contents
- Discover Space Utilization inside a HDFS Directory
- Download Files From HDFS to Local Machine
- Explore Two Advanced Features
- Summary
- Further Studying
Download the Motorists Related Datasets
We’ll download geolocation.csv and trucks.csv data onto our local filesystems from the sandbox. The instructions are targeted at mac and linux users.
Then, we’ll download geolocation.csv and trucks.csv data onto our local filesystems from the sandbox. The instructions are targeted at mac and linux users.
1. Open a terminal in your local machine, SSH in to the sandbox:
ssh root@sandbox-hdp.hortonworks.com -p 2222
Note: If you are on VMware or Docker, make sure that you map the sandbox IP towards the correct hostname within the hosts file. Map your Sandbox IP
2. Open another terminal, improve your current directory to Downloads then copy the instructions to download the geolocation.csv and trucks.csv files. We’ll rely on them basically we learn file management operations.
#Improve your current directory to Downloads
cd Downloads
#Download geolocation.csv
wget https://github.com/hortonworks/data-tutorials/raw/master/tutorials/hdp/manage-files-on-hdfs-via-cli-ambari-files-view/assets/motorists-datasets/geolocation.csv
#Download trucks.csv
wget https://github.com/hortonworks/data-tutorials/raw/master/tutorials/hdp/manage-files-on-hdfs-via-cli-ambari-files-view/assets/motorists-datasets/trucks.csv
#Create directory for motorists-datasets
mkdir motorists-datasets
#Slowly move the geolocation and trucks csv files towards the directory
mv geolocation.csv trucks.csv motorists-datasets/
Produce a Directory in HDFS, Upload personal files and List Contents
Create Directory Tree in User
1. Login to Ambari Interface at sandbox-hdp.hortonworks.com:8080. Make use of the following login credentials in Table 1.
Table 1: Ambari Login credentials
| Username | Password |
|---|---|
| admin | **setup process |
Setup Ambari Admin Password By hand
2. Now we have admin rights, we are able to manage files on HDFS using Files View. Hover within the Ambari Selector Icon , go into the Files View web-interface.
The Files View Interface can look using the following default folders.
3. We’ll create 3 folders while using Files View web-interface. All three folders: hadoop, geolocations and trucks the final two that will live in the hadoop folder, which resides in user.
Navigate in to the user folder. Click on the new folder button , an add new folder window seems and name the folder hadoop. Press enter or +Add
4. Navigate in to the hadoop folder. Produce the two folders: geolocation and trucks following a process mentioned in the last instruction.
Upload Local Machine Files to HDFS
We’ll upload two files from your local machine: geolocation.csv and trucks.csv to appropriate HDFS directories.
1. Travel through the road /user/hadoop/geolocation or maybe you are already in hadoop, go into the geolocation folder. Click on the upload button to transfer geolocation.csv into HDFS.
An Upload file window seems:
2. Click the cloud by having an arrow. A window with files out of your local machine seems, find geolocation.csv within the Downloads/motorists_datasets folder, select it after which press open button.
3. In Files View, visit the hadoop folder and go into the trucks folder. Repeat the upload file tactic to upload trucks.csv.
View and look at Directory Contents
Every time we open a directory, the Files View instantly lists the contents. Earlier we began within the user directory.
1. Let us navigate to the user directory to look at the facts provided by the contents. Reference the look below when you browse the Directory Contents Overview.
Directory Contents Summary of Posts
- Name would be the files/folders
- Size contains bytes for that Contents
- Last Modified includes the date/time the information was produced or Modified
- Owner is the master of that contents
- Group is who are able to make changes towards the files/folders
- Permissions establishes who are able to read, write and execute data
Discover Space Utilization inside a HDFS Directory
Within the command line once the directories and files are listed using the hadoop fs -du /user/hadoop/, how big your directory and file is proven. In Files View, we have to visit the file to determine the dimensions, we aren’t able to begin to see the size from the directory even when it has files.
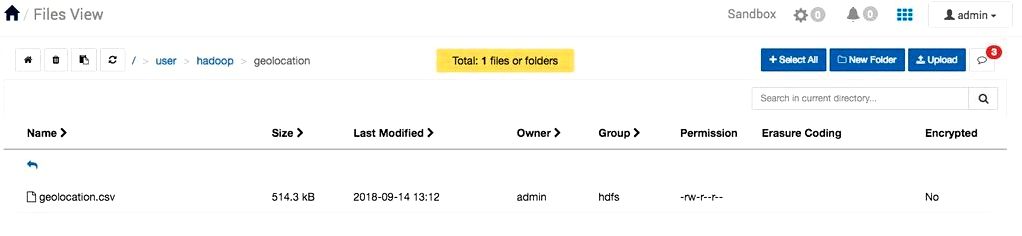
Let us view how big geolocation.csv file. Travel through /user/hadoop/geolocation. Just how much space has got the file utilized? Files View shows 514.3 KB for geolocation.csv.
Download File From HDFS to Local Machine
Files View enables users to download folders and files for their local machine effortlessly.
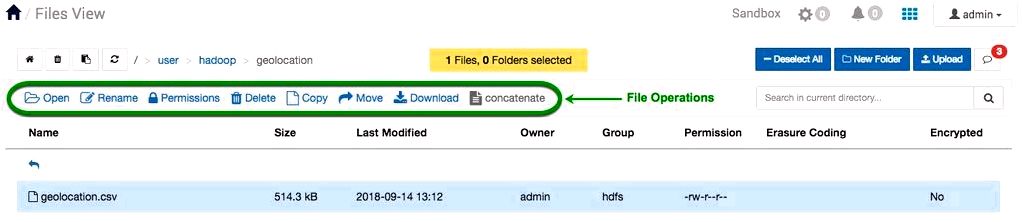
Let us download the geolocation.csv file to the computer. Click the file’s row, the row’s color becomes blue, several file operations can look, choose the Download button. The default directory the file downloads to is our Download folder on the local machine.
Explore Two Advanced Features
Concatenate Files
File Concatenation merges two files together. When we concatenate trucks.csv with geolocation.csv, the information from geolocation.csv is going to be appended towards the finish of trucks.csv. An average use situation for any user to make use of this selection is whether they have similar large datasets that they would like to merge together. The manual tactic to combine large datasets is inconvenient, so file concatenation was produced to complete the operation instantly.
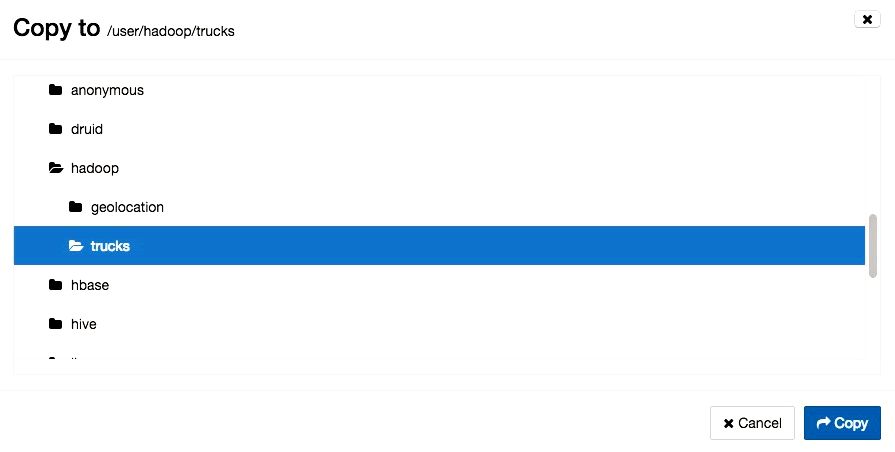
1. Before we merge the csv files, we have to put them within the same folder. Click geolocation.csv row, it’ll highlight in blue, then press copy as well as in the copy window seems, choose the trucks folder and press Copy to repeat the csv file into it.
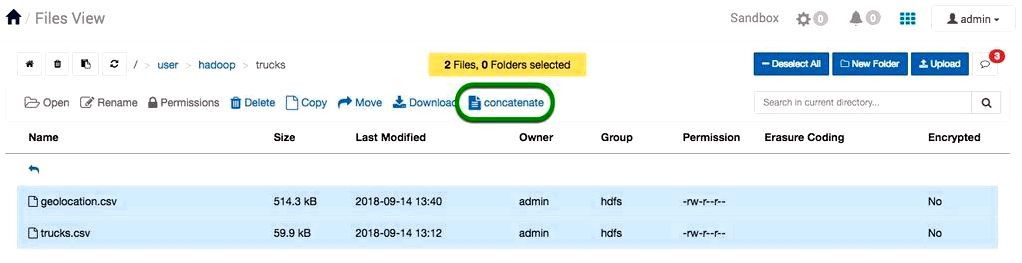
2. We’ll merge two large files together by selecting both of them and performing concatenate operation. Visit the trucks folder. Select geolocation.csv, hold shift and then click trucks.csv. Click on the concatenate button. The files is going to be downloaded in to the Download folder in your local machine.
3. Automatically, Files View saves the merged files like a txt file, we are able to open the file and reserve it like a csv file. Then open the csv file and you will see that all of the content from geolocation is appended towards the trucks file.
Copy Files or Directories recursively
Copy file or directories recursively means all of the directory’s files and subdirectories to the foot of your directory tree are copied. For example, we’ll copy the hadoop directory and every one of its contents to a different location inside our hadoop cluster. Being produced, the copy operation can be used to repeat large datasets inside the hadoop cluster or between two or more clusters.
1. Visit the user directory. Click the row from the hadoop directory. Choose the Copy button  .
.
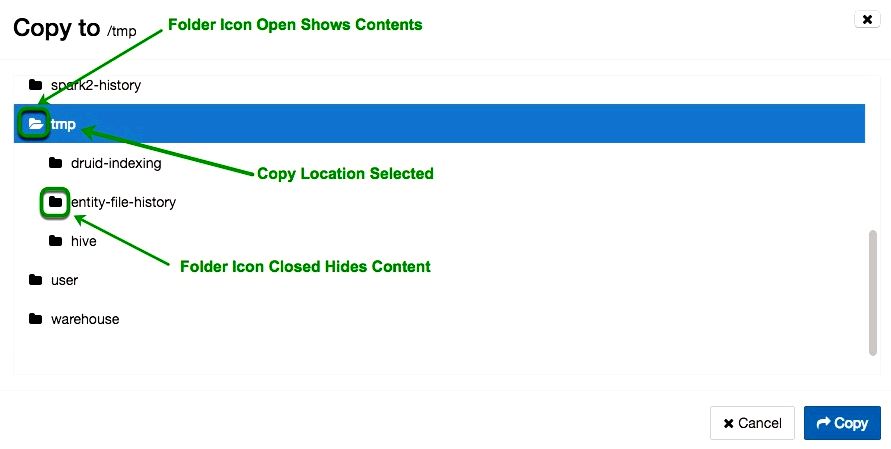
2. The Copy to window can look. Choose the tmp folder, the row will turn blue. If you choose the folder icon, the items in tmp come into sight. Make certain the row is highlighted blue to complete the copy. Click on the blue Copy button to repeat the hadoop folder recursively for this new location.
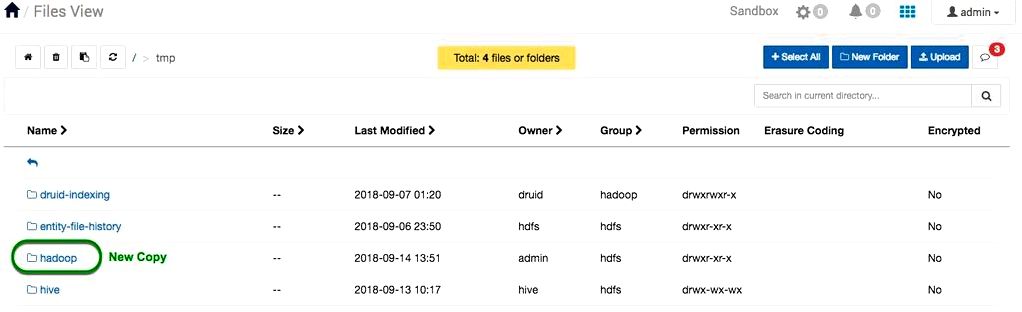
3. A brand new copy from the hadoop folder and every one of its contents are available in the tmp folder. Navigate to tmp for verification. Make sure that all the hadoop folder’s contents copied effectively.
Summary
Congratulations! We simply learned to make use of the Files View to handle our geolocation.csv and trucks.csv dataset files in HDFS. We learned to produce, upload and list the contents within our directories. We acquired the abilities to download files from HDFS to the local file system and explored a couple of advanced options that come with HDFS file management.
Further Studying
- HDFS Overview
Resourse: https://cloudera.com/tutorials/manage-files-on-hdfs-via-cli-ambari-files-view/