How you can download, install and hang up sonicwall analyzer
 05/06/2019 1566 35816
DESCRIPTION:
This short article summarizes a step-by-step technique of cellular phone and hang from analyzer having a SonicWall firewall.
RESOLUTION:
Step1. Download: The Analyzer installation file obtainable out of your MysonicWall account in the Download Center. Analyzer may come as GMS/Analyzer – Virtual Appliance and GMS/Analyzer Home windows distributions (Fig. 1). This short article discusses installing the Home windows version on the Server 2012R2.
Home windows Operating-system needs for Analyzer 8.5: Home windows Server 2012 Standard 64-bit, Home windows server 2012R2 Standard 64-bit, Home windows server 2012R2 Data Center, Home windows 8.1 64-bit.
Analyzer uses two separate databases for storing the configurations (e.g., MySQL) and storing the reports (e.g., Infobright). A significant improvement within the newer versions of Analyzer is using Postgres SQL for storing the reports. This transformation is reflected within the two kinds of installation files available under each software version. For instance, for those who have an earlier form of Analyzer (e.g., 8.1) and you need to upgrade towards the later version, please download the SW 8.2 GMS/Analyzer Home windows or GMS/Analyzer Home windows (for version 8.3) file. If you’re thinking about a brand new installation, please download either SW 8.2 GMS/Analyzer RV2 Home windows or GMS/Analyzer Postgres Home windows (for version 8.3) file. When you are within the Download Center, please consider installing a duplicate from the Analyzer Administrator Guide, which supplies step-by-step instructions for that installation, configuration and administration.
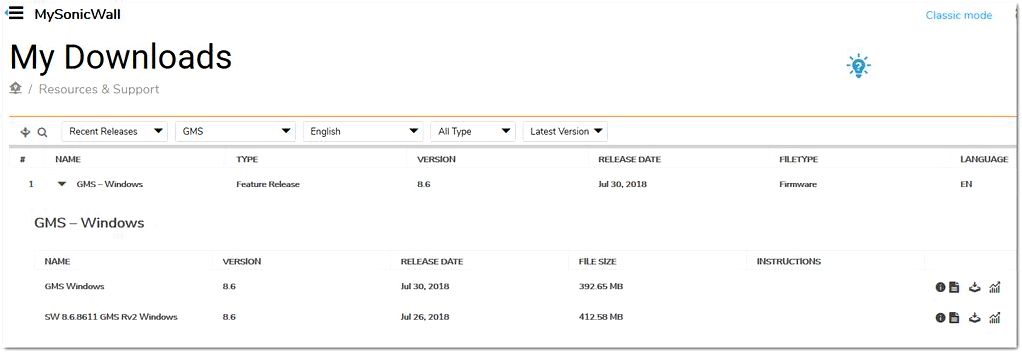
Fig. 1. Installing the Analyzer installation file.
Step Two. Installation: Double-clicking cellular phone file will show you with the installation procedure. Please make certain you will find the Ip from the analyzer installation (e.g., Server 2012R2) and also the SonicWall Network Appliance. Installations steps are summarized below with screenshots (Fig. 2).
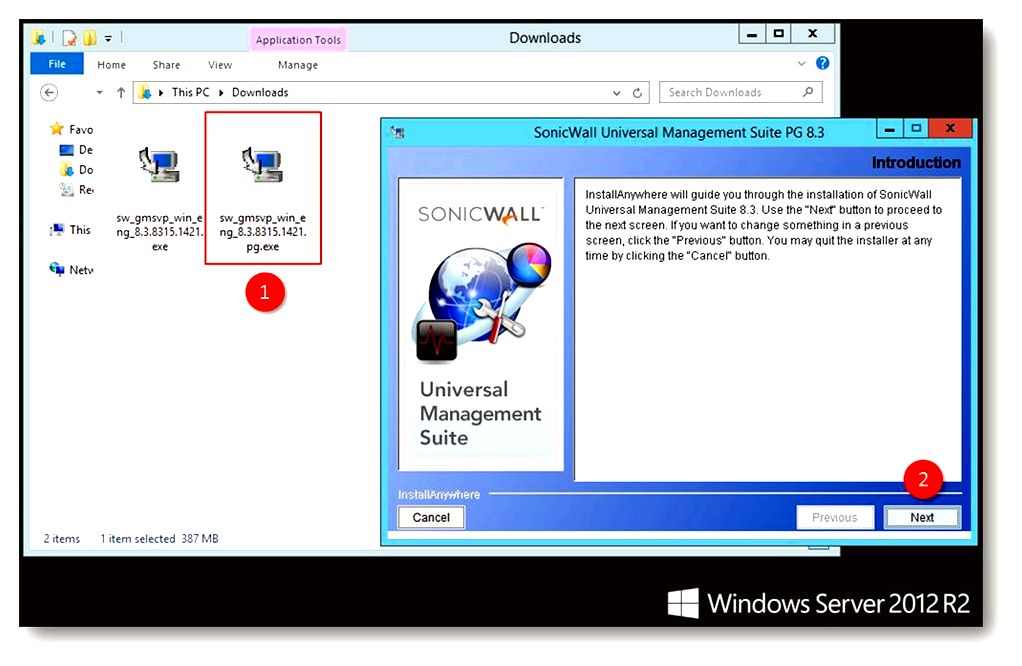

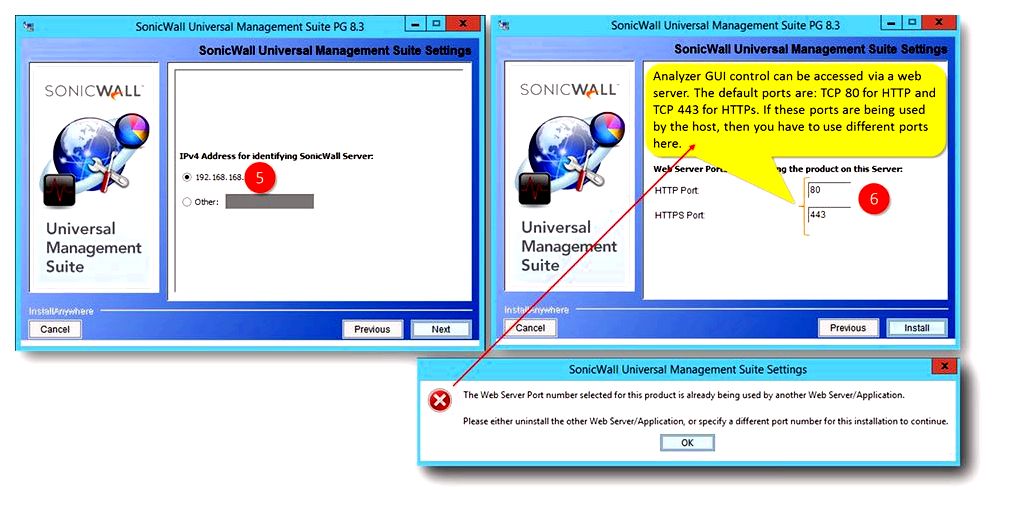
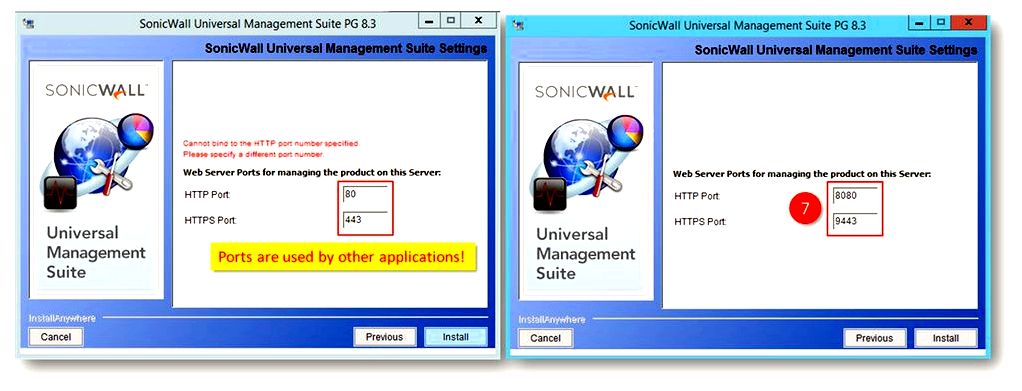
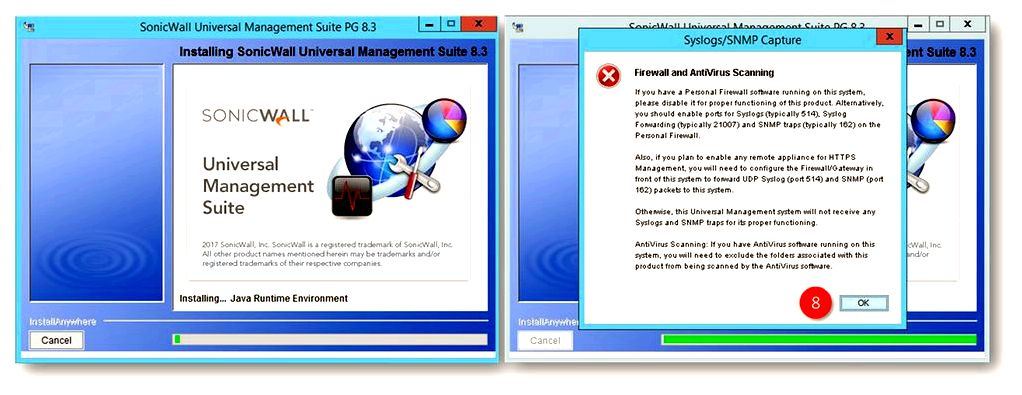
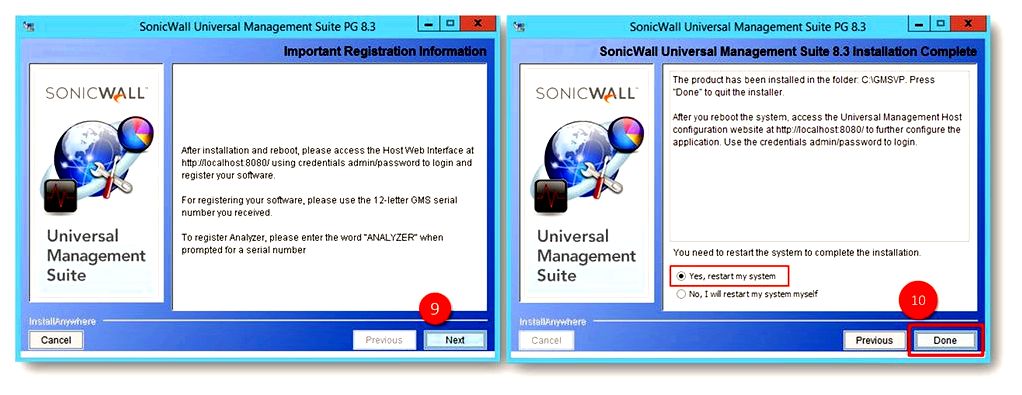
Fig. 2. Installing of Analyzer on the Home windows host.
As the installation procedure outlined above is self-explanatory, let’s evaluate the following stages in Fig. 2.
(5) The Ip could be acquired from Network Connection Information on the host. It may be beneficial to set up the analyzer within the subnet because the SonicWall Firewall Ip, e.g., 192.168.168./24 here. When the Analyzer and SonicWall firewall have been in different subnets, one must make certain that they’re contacting one another.
(6) The Analyzer Graphical user interface control could be utilized using a server by typing https://localized:port number or https://IP.Address:portnumber. These web protocols use TCP port 80 (HTTP) and TCP port 443 (HTTPs). When you get a mistake concerning the ports “… already getting used by another ServerOrSoftware…”, alter the default ports to some alternative port figures (as with 7).
05/06/2019 1566 35816
DESCRIPTION:
This short article summarizes a step-by-step technique of cellular phone and hang from analyzer having a SonicWall firewall.
RESOLUTION:
Step1. Download: The Analyzer installation file obtainable out of your MysonicWall account in the Download Center. Analyzer may come as GMS/Analyzer – Virtual Appliance and GMS/Analyzer Home windows distributions (Fig. 1). This short article discusses installing the Home windows version on the Server 2012R2.
Home windows Operating-system needs for Analyzer 8.5: Home windows Server 2012 Standard 64-bit, Home windows server 2012R2 Standard 64-bit, Home windows server 2012R2 Data Center, Home windows 8.1 64-bit.
Analyzer uses two separate databases for storing the configurations (e.g., MySQL) and storing the reports (e.g., Infobright). A significant improvement within the newer versions of Analyzer is using Postgres SQL for storing the reports. This transformation is reflected within the two kinds of installation files available under each software version. For instance, for those who have an earlier form of Analyzer (e.g., 8.1) and you need to upgrade towards the later version, please download the SW 8.2 GMS/Analyzer Home windows or GMS/Analyzer Home windows (for version 8.3) file. If you’re thinking about a brand new installation, please download either SW 8.2 GMS/Analyzer RV2 Home windows or GMS/Analyzer Postgres Home windows (for version 8.3) file. When you are within the Download Center, please consider installing a duplicate from the Analyzer Administrator Guide, which supplies step-by-step instructions for that installation, configuration and administration.
Fig. 1. Installing the Analyzer installation file.
Step Two. Installation: Double-clicking cellular phone file will show you with the installation procedure. Please make certain you will find the Ip from the analyzer installation (e.g., Server 2012R2) and also the SonicWall Network Appliance. Installations steps are summarized below with screenshots (Fig. 2).
Fig. 2. Installing of Analyzer on the Home windows host.
As the installation procedure outlined above is self-explanatory, let’s evaluate the following stages in Fig. 2.
(5) The Ip could be acquired from Network Connection Information on the host. It may be beneficial to set up the analyzer within the subnet because the SonicWall Firewall Ip, e.g., 192.168.168./24 here. When the Analyzer and SonicWall firewall have been in different subnets, one must make certain that they’re contacting one another.
(6) The Analyzer Graphical user interface control could be utilized using a server by typing https://localized:port number or https://IP.Address:portnumber. These web protocols use TCP port 80 (HTTP) and TCP port 443 (HTTPs). When you get a mistake concerning the ports “… already getting used by another ServerOrSoftware…”, alter the default ports to some alternative port figures (as with 7).
(8) This can be a general observe that informs the consumer about Home windows firewall needs. It may be beneficial to produce a firewall exclusion for that Analyzer ports within the Home windows firewall.
(10) Please be aware you need to restart the host following the installation for that needed services to begin.
Step Three. First login and Registration: When the Analyzer is installed, it may be can get on using a internet browser. Please be aware the very first time, you’ll be forwarded to an HTTP page as with Fig. 3. The default username is admin and password is password . After you have registered cellular phone all subsequent login pages uses HTTPs. It’s possible to also connect to the web Graphical user interface by double-clicking the Analyzer Icon.
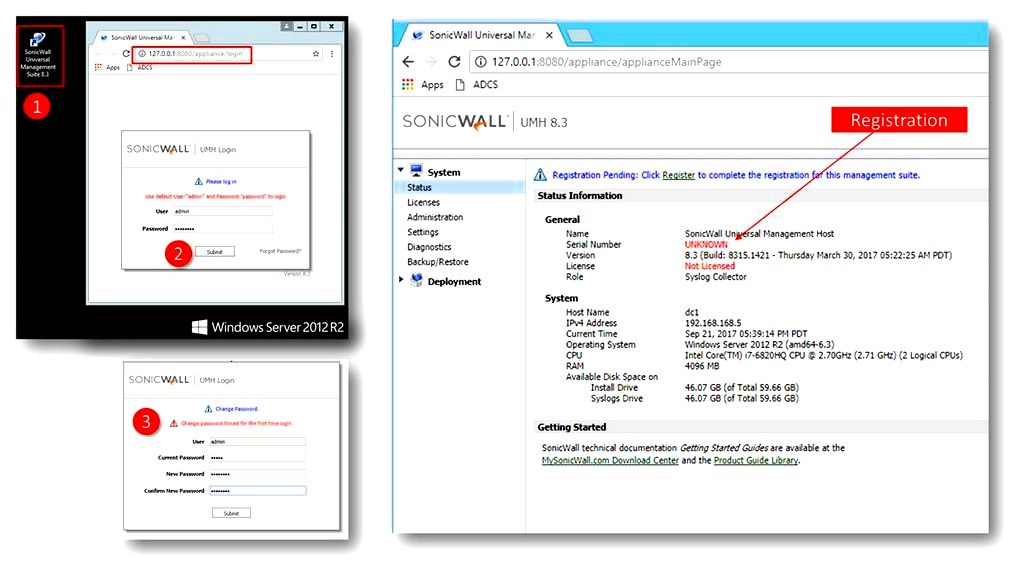
Fig. 3. Very first time login to Analyzer Graphical user interface control.
For registration, the host (computer) should be attached to the Internet to ensure that Analyzer can contact the license server (Fig. 4). One will need to present the credentials for that MySonicWall account (4). If you work with a brand new installation, the default serial number is analyzer (5). If you have permission the system will retrieve the data and also the license number. It may be beneficial to provide an amiable reputation for the Analyzer.
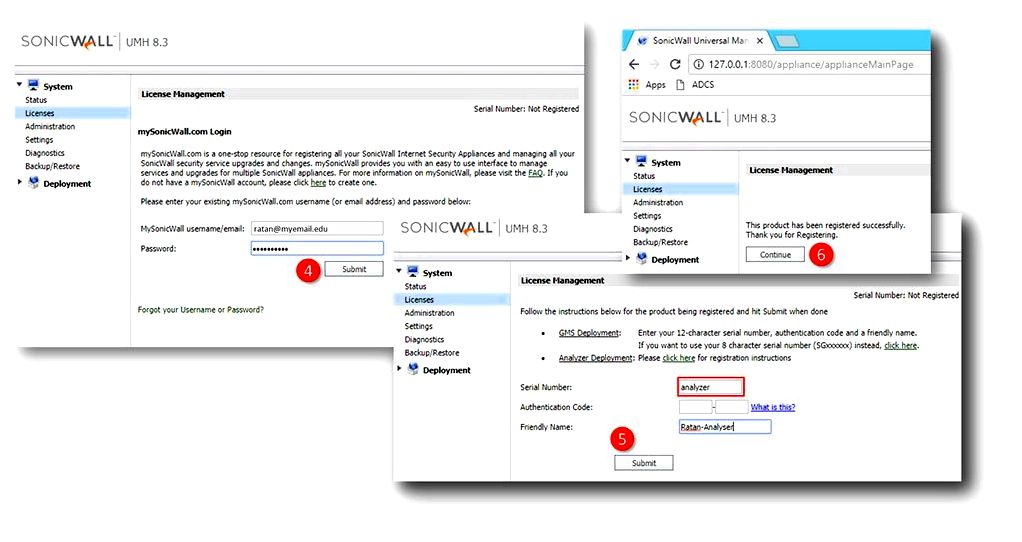
Fig. 4. Analyzer registration.
Step Four. Deploy Role: Initial configuration for that analyzer requires the Role deployment (Fig. 5), where one must set a MySQL root password (2) and designate a database configuration user (1). Observe that Analyzer uses the default Syslog port UDP 514 and TCP 3306 for MySQL. During Deployment the Syslog port could be editted however the MySQL port cannot.
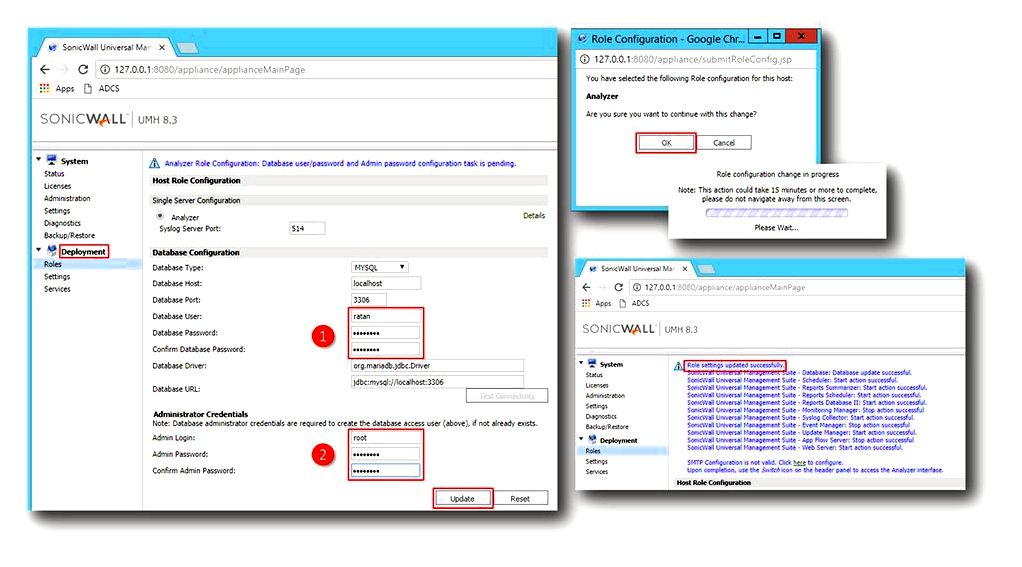
Fig. 5. Analyzer Role Deployment.
Analyzer uses two kinds of user accounts- (1) and (2) in Fig. 5. Please carefully store passwords once you have updated here. Also observe that the main password setup choice is only accessible throughout the role deployment
An email about Analyzer Graphical user interface views.
Analyzer presents two views (Fig. 6) – System Interface View (1) and Application Interface View (2). They may be utilized through the Switch button on top right control button area. Following the initial setup,the majority of the user interaction occur in the applying Interface.
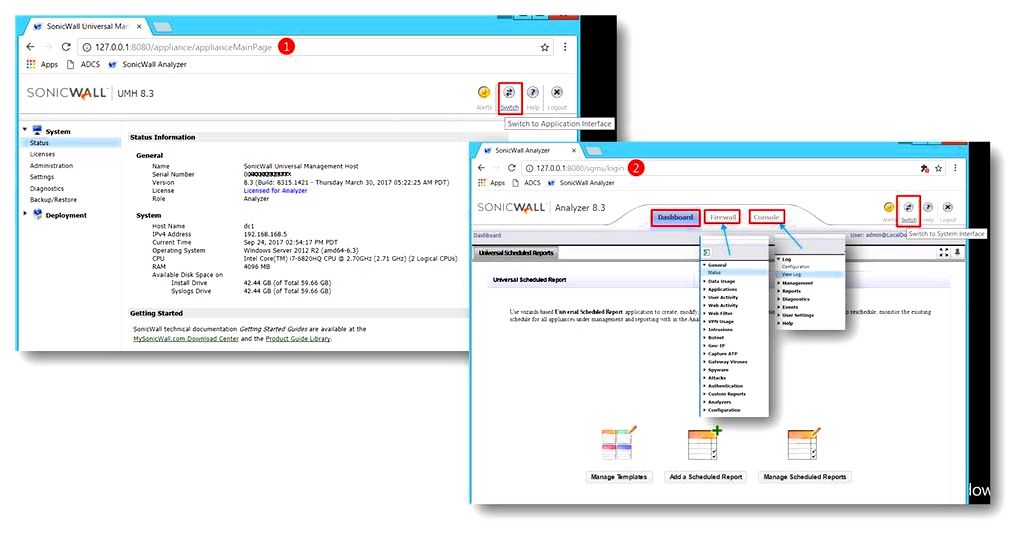
Fig. 6. Analyzer Graphical user interface views.
Step Five. Give a SonicWall Network Security Appliance.
Please navigate to Firewall tab and click on the button with eco-friendly arrow on top left (e.g., one in Fig. 7). This can bring 5 more controls (2) as indexed by the insert of Fig. 7. The very first in the left enables someone to give a unit. The Analyzer ‘talks’ to the SonicWall Network Security Appliance using HTTPs. Please give a friendly Unit Name to recognize the applying, its Serial Number, Ip and also the admin access information- admin login name, password, and also the Management port (e.g., 443).
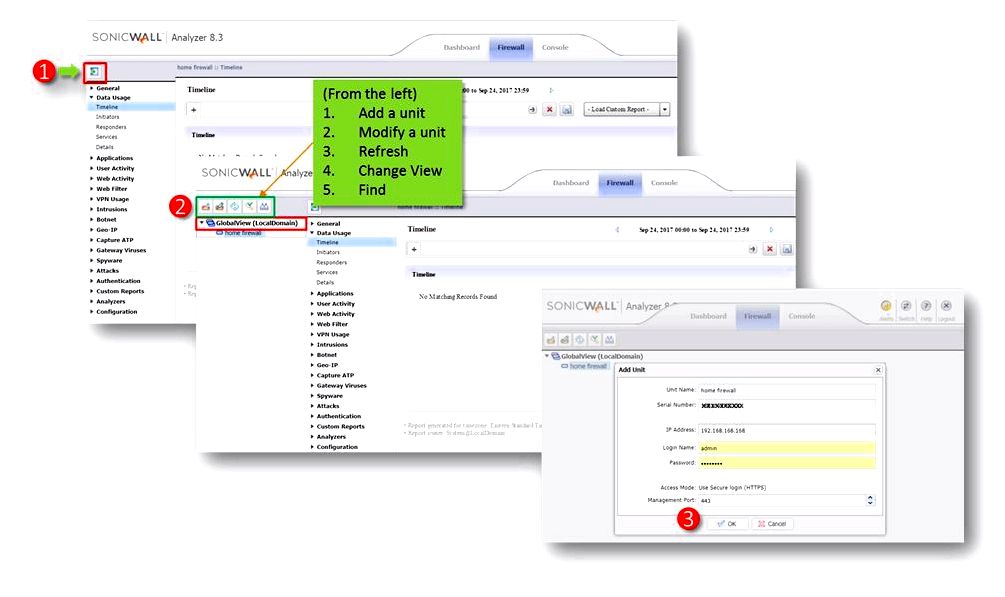
Fig. 7. Adding a SonicWall Firewall towards the Analyzer.
Step Six. Provision the SonicWall Network Security Appliance:
Around the firewall, please navigate to Log Analyzer, (1) select Enable Analyzer Settings and (2) click Save. Next (3) click Add to include the Analyzer information like the Ip from the Analyzer. Remaining information might be selected because the default. However, for those who have used another Syslog port, please update it here.
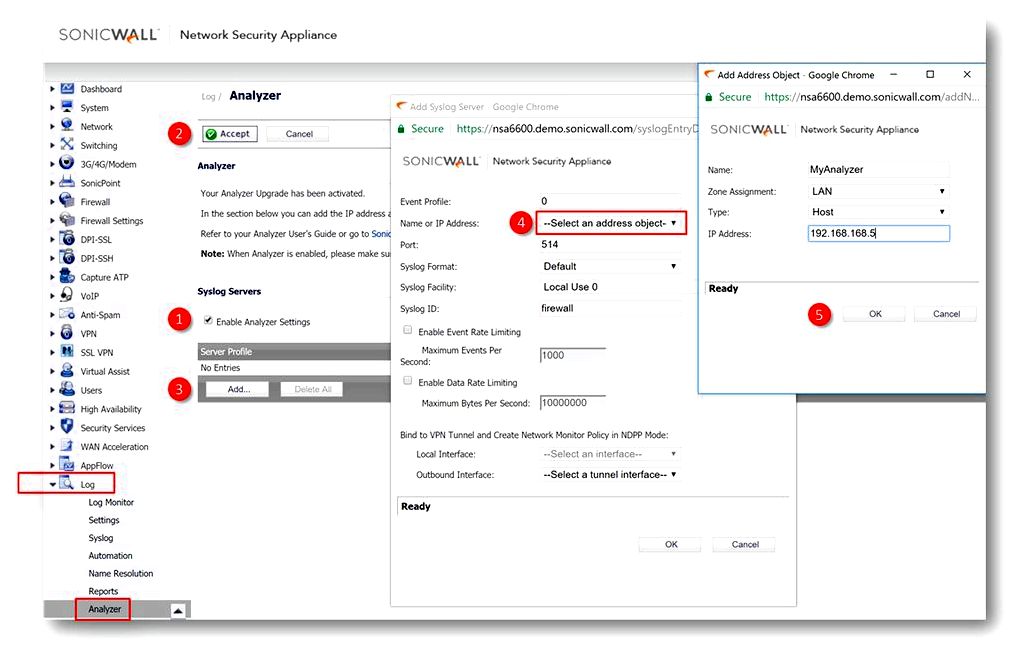
Fig. 8. Provisioning a SonicWall Network Security Appliance to transmit logs for an Analyzer.
Now we have established a communication between your Analyzer and also the SonicWall Network Security Appliance, its (Network Security Appliance) syslog will forward the logs towards the Analyzer. Please make reference to the KB that summarizes the ports used.
Step 7. Summarize the logs.
should you visit the Data Usage Timeline in Firewall tab from the Analyzer there won’t be any reports. (Fig. 9). The reason why with this is the fact that even though the Analyzer has got the logs it is not Summarized. Please navigate to Console Reports Summarizer Summarizer now.
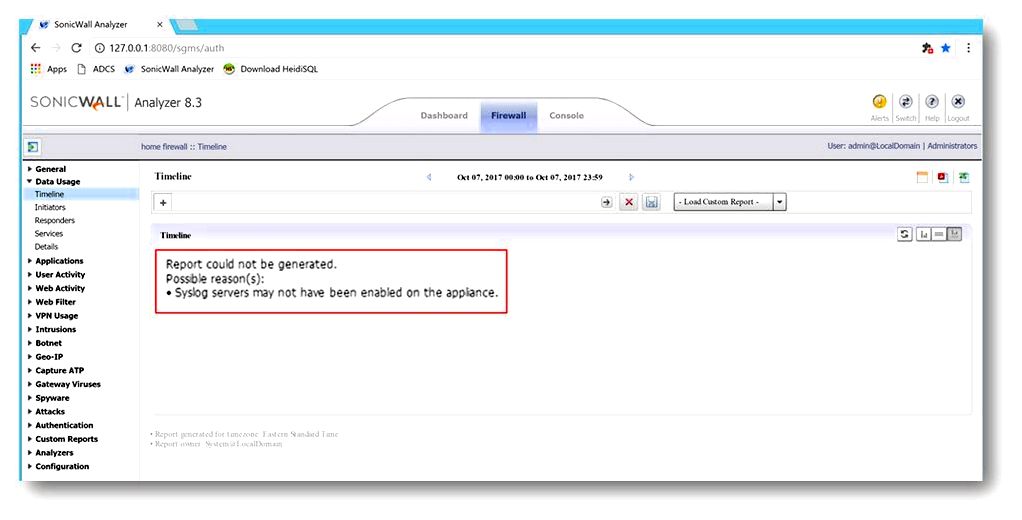
Fig. 9. A look at the information Usage Timeline before Summarization.
Step 8: Enable Syslog Forwarding.
Navigate to Firewall Global View Real-time Viewer Syslog Settings and click on Enable syslog forwarding after which Update and begin (Fig. 10).
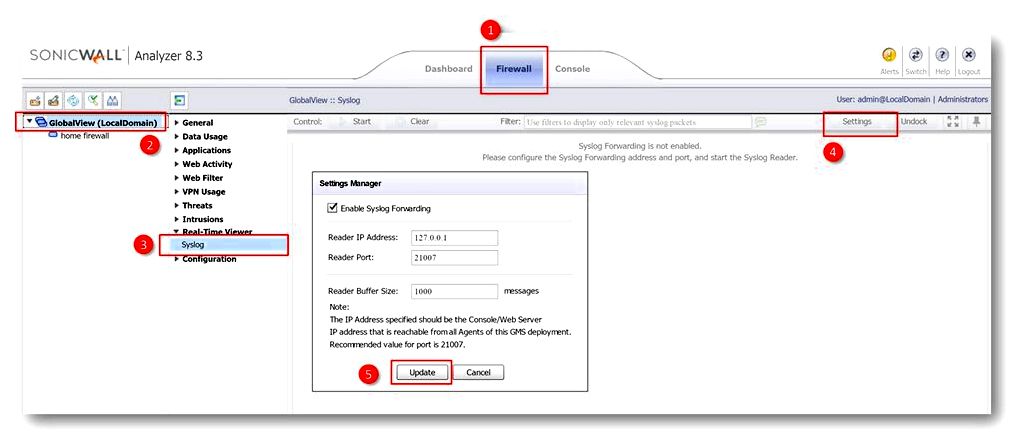
Fig. 10. Enable Syslog Forwarding.
Click the Syslog again and you’ll begin to see the logs (Fig. 11).
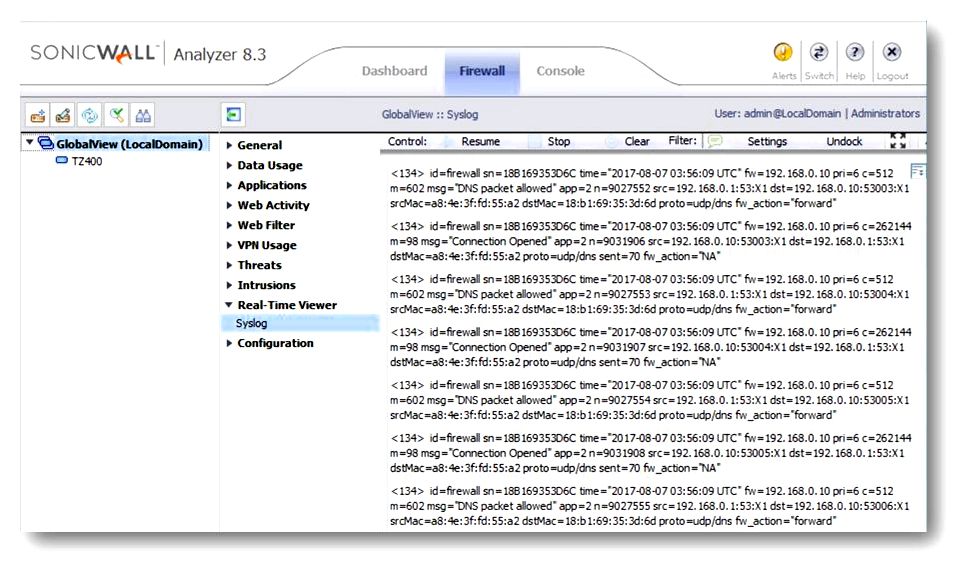
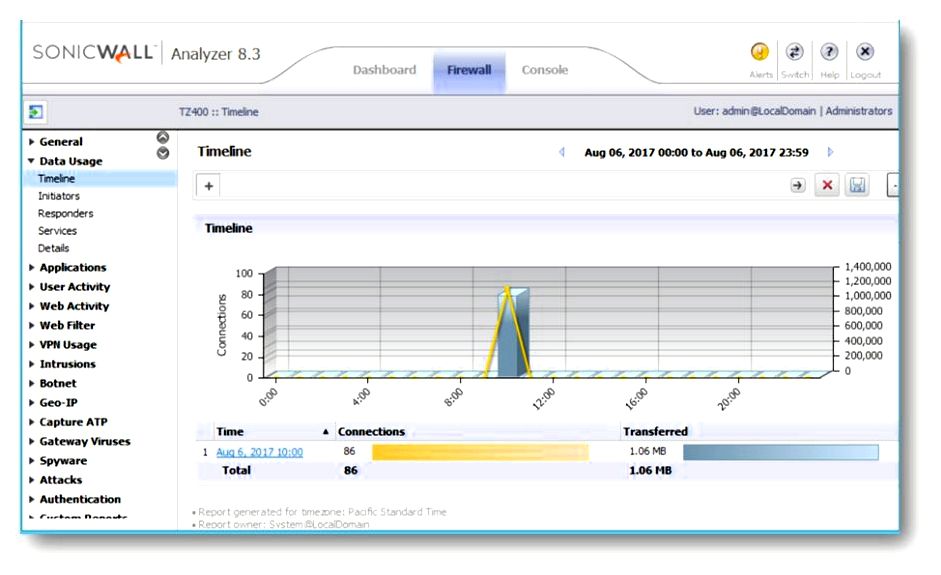
Fig. 11. Effective Analyzer setup with logs.
Further Studying:
Support page
Installation:
Video Analyzer Installation
Analyzer will not start – troubleshooting installation
Backup and Restore – Backup and Restore Analyzer
Upgrading Analyzer
How you can integrate Analyzer software with SonicWall UTM Appliance
How do you use a fresh demonstration of Analyzer – Virtual Appliance
How you can install GMS/Analyzer Software on the Home windows System
Troubleshooting:
Troubleshooting of recent Analyzer/GMS instance when there aren’t any reports
Analyzer: How to see if SonicWall transmits out logs to syslog server and syslog server receives them
Troubleshooting of recent Analyzer/GMS instance when there aren’t any reports (GMS – Analyzer)
Most widely used GMS/Analyzer configurations and troubleshooting articles
How do you trobleshoot and fix when the syslogs aren’t coming in the syslog folder in GMS or Analyzer? – Host firewall Issue
Troubleshooting “Report couldn’t be generated” message
Viewing MySQL Database using the MySQL browser
Resourse: https://sonicwall.com/support/understanding-base/how-to-download-install-and-set-up-sonicwall-analyzer/170901182222484/
